If you’re looking to enhance the flavor and durability of your Lodge cast iron pan, you’ve come to the right place! In this article, we’ll guide you through the process of seasoning your cast iron pan, providing you with expert tips and advice along the way. From understanding the benefits of cooking with cast iron to troubleshooting common seasoning issues, we cover it all.
Whether you’re a seasoned cast iron enthusiast or just starting out, this comprehensive guide will equip you with all the knowledge you need to ensure your Lodge cast iron pan remains in top-notch condition for years to come.
So, let’s get started and unlock the full potential of your cast iron cooking experience!

Cooking with Cast Iron
Cooking with cast iron is a fantastic way to elevate your meals to the next level. Whether you’re a professional chef or a home cook, using cast iron in your kitchen has many benefits that can enhance your cooking experience.
From its excellent heat retention to its versatility in the kitchen, cast iron is a must-have tool for any culinary enthusiast.
 Why choose cast iron?
 Why choose cast iron?
There are several reasons why you should choose cast iron cookware. First and foremost, cast iron is known for its exceptional heat retention properties. This means that once your pan is heated, it will stay hot, allowing your food to cook evenly and efficiently. Cast iron also distributes heat evenly, ensuring that every part of your dish is cooked to perfection.
Additionally, cast iron pans are incredibly durable and long-lasting. Unlike other types of cookware, cast iron can withstand high temperatures and is resistant to warping. When properly cared for, a cast iron pan can last for generations, making it a worthwhile investment.
Benefits of cooking with cast iron
Cooking with cast iron offers numerous benefits that can enhance your culinary creations. One of the main advantages is the versatility of cast iron pans.
They can be used on a variety of heat sources, including gas stoves, electric stoves, ovens, and even grills. This means that you can seamlessly transition from stovetop to oven, opening up a world of cooking possibilities.
Another benefit of using cast iron is its natural non-stick surface. When seasoned properly, a cast iron pan develops a layer of seasoning that prevents food from sticking. This allows you to cook with less oil or butter, resulting in healthier meals.
Cast iron also adds a unique flavor to your dishes. The iron in the pan can subtly enhance the taste of your food, giving it a delicious, rustic flavor that is hard to replicate with other types of cookware.
 Types of dishes you can cook with cast iron
 Types of dishes you can cook with cast iron
The versatility of cast iron pans means that you can cook a wide range of dishes with this cookware. From sautéing vegetables to searing steaks, the possibilities are endless. Here are some popular dishes you can cook with cast iron:
- Pan-seared salmon: Achieve a crispy skin and perfectly cooked flesh by using a cast iron pan. The even heat distribution ensures that your salmon is cooked to perfection.
- Dutch oven bread: Baking bread in a cast iron Dutch oven creates a crisp crust and a soft, moist interior.
- The heavy lid helps to retain steam, resulting in a bakery-worthy loaf.
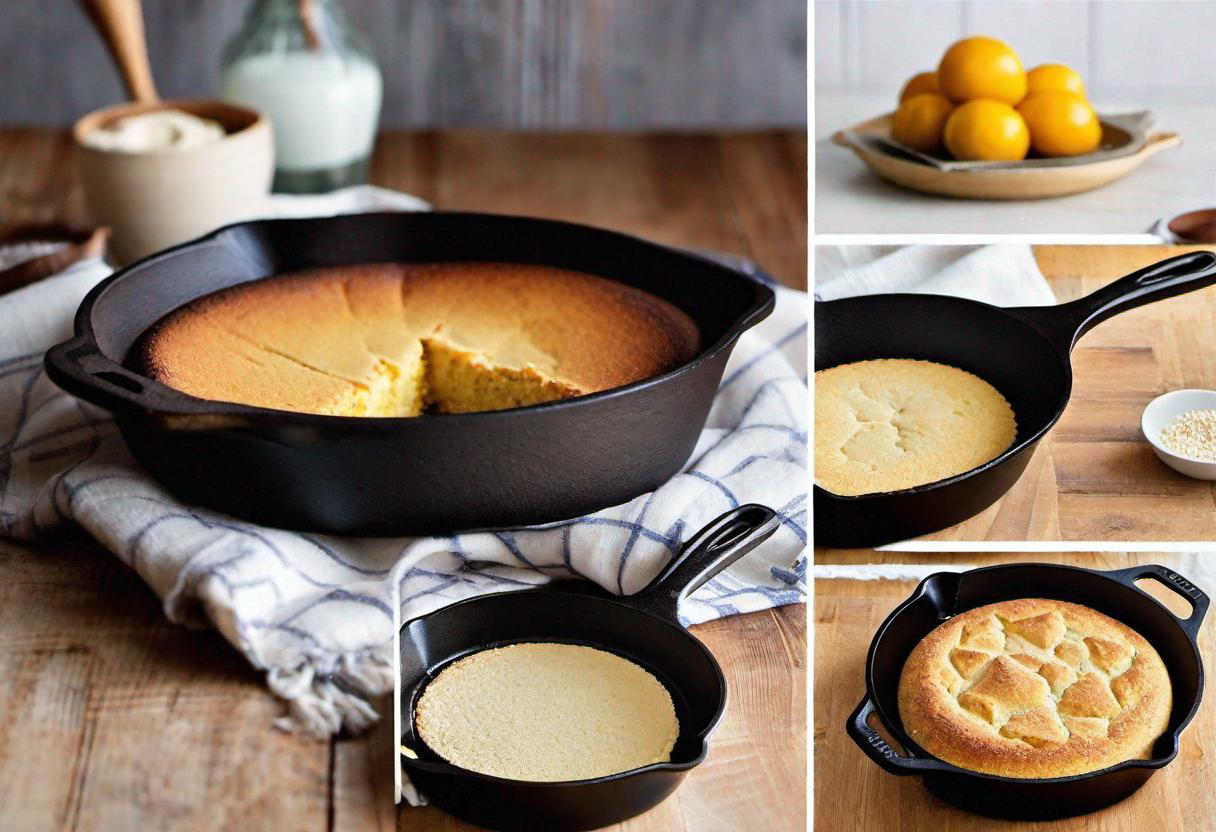
- Skillet cornbread: The crispy edges and tender middle of cornbread baked in a cast iron skillet are unbeatable. The even heat distribution of the pan ensures that every slice is cooked to perfection.
- Stir-fried veggies: The high heat retention of cast iron makes it ideal for stir-frying vegetables. The pan gets hot quickly and maintains a steady temperature, allowing you to achieve that perfect char on your veggies.
With cast iron, the possibilities are endless. Experiment with different recipes and discover the joy of cooking with this versatile cookware.
Cast Iron Seasoning
What is cast iron seasoning?
Cast iron seasoning refers to the process of creating a natural non-stick surface on your cast iron cookware. This is achieved by applying a layer of oil or fat to the surface of the pan and heating it to a high temperature.
The heat causes the oil to polymerize, creating a protective layer that prevents food from sticking and helps in the even distribution of heat.
Why is seasoning important?
Seasoning your cast iron pan is crucial for several reasons. Firstly, it creates a non-stick surface, which makes cooking and cleaning much easier. A well-seasoned pan allows food to be released easily, reducing the need for excessive oil or butter.
Seasoning also helps to prevent rust by creating a protective barrier on the surface of the cast iron.
Furthermore, seasoning enhances the flavor of your food. As the cast iron develops a layer of seasoning, it imparts a unique flavor to your dishes that cannot be replicated with other types of cookware.
Pre-seasoned vs. seasoning yourself
When purchasing a new cast iron pan, you may have the option of choosing between pre-seasoned or unseasoned cookware. Pre-seasoned pans come with a base layer of seasoning applied by the manufacturer, making them ready to use right out of the box.
This can be convenient for those who are new to cast iron cooking or prefer to skip the initial seasoning process.
On the other hand, seasoning the pan yourself allows you to have more control over the process. By seasoning the pan from scratch, you can build up multiple layers of seasoning over time, resulting in a superior non-stick surface. This process may require a bit more effort initially, but the results are well worth it.
If you choose to season your cast iron pan yourself, follow these steps:
- Preheat your oven to 350°F (175°C).
- Clean your cast iron pan thoroughly, removing any rust or debris.
- Apply a thin layer of cooking oil or shortening to the entire surface of the pan.
- Use a paper towel to wipe off any excess oil – the pan should appear dry.
- Place the pan upside down in the oven, with a baking sheet or aluminum foil underneath to catch any drips.
- Bake the pan for one hour, then turn off the oven and let the pan cool completely in the oven.
Repeat this process several times to build up a robust layer of seasoning. With each use and proper maintenance, your cast iron pan will continue to develop its non-stick surface and improve in performance.

How to Clean Cast Iron
Properly cleaning your cast iron pan is essential to maintain its longevity and performance. While it may seem intimidating at first, cleaning cast iron is simple and straightforward. By following a few basic steps, you can ensure that your pan remains in excellent condition for years to come.
Cleaning cast iron after each use
After each use, it’s important to clean your cast iron pan promptly. Here’s how:
- Allow the pan to cool slightly, but not completely. Cleaning a warm pan makes it easier to remove food particles.
- Rinse the pan under warm water, using a sponge or brush to remove any food residue. Avoid using soap, as it can strip away the seasoning.
- If there are stubborn food particles stuck to the pan, you can use a nylon scrub brush or scraper to gently loosen them.
- Once the pan is clean, rinse it thoroughly and dry it immediately with a kitchen towel or paper towel.
- Place the pan back on the stovetop over low heat for a minute or two to ensure it is completely dry.
Avoiding soap and water
Contrary to popular belief, you do not need to use soap and water to clean your cast iron pan. In fact, using soap can strip away the seasoning that you’ve worked so hard to build up. Instead, opt for the rinse-and-dry method mentioned above.
If there are stubborn, stuck-on food particles that cannot be removed with a gentle scrub, you can create a paste using coarse salt and water. Apply the paste to the pan and use a sponge or brush to scrub away the residue. Rinse thoroughly and dry immediately.
Removing stubborn, stuck-on food
If you encounter stubborn, stuck-on food that is difficult to remove, there are a few methods you can try:
- Boiling water: Fill the pan with water and bring it to a boil. This will help to loosen the food particles, making them easier to remove.
- Salt scrub: Sprinkle coarse salt onto the surface of the pan, then use a sponge or brush to scrub away the residue. The salt acts as an abrasive agent.
- Vinegar soak: Create a mixture of equal parts water and white vinegar. Pour the mixture into the pan and let it soak for a few minutes. The acidity of the vinegar will help dissolve the stuck-on food.
Remember to rinse the pan thoroughly after using any of these methods and dry it immediately to prevent rust.
Drying and storing cast iron
Properly drying and storing your cast iron pan is crucial to prevent rust. After washing and rinsing, immediately dry the pan using a kitchen towel or paper towel.
To ensure that all moisture is removed, you can place the pan back on the stove over low heat for a minute or two.
Once the pan is dry, apply a thin layer of cooking oil or shortening to the surface. This will help to prevent rust and maintain the seasoning. Store the pan in a cool, dry place with the lid off to allow for proper air circulation.
Troubleshooting
Despite its many benefits, cast iron cookware may encounter a few issues from time to time. Here are some common troubleshooting tips to help you address these problems:
Dealing with rust
If your cast iron pan develops rust, don’t panic – it can be easily remedied. Follow these steps to remove rust from your pan:
- Scrub the rusted area with a scrub brush or steel wool until the rust is completely removed.
- Rinse the pan under warm water and dry it thoroughly.
- Apply a thin layer of cooking oil or shortening to the affected area.
- Place the pan in a preheated oven at 350°F (175°C) for one hour.
- Let the pan cool completely in the oven before removing.
By following these steps, you can restore your cast iron pan to its former glory and continue cooking with it for years to come.
Restoring old, neglected cast iron
If you come across an old, neglected cast iron pan that needs a little TLC, don’t worry – it can still be revived. Follow these steps to restore an old cast iron pan:
- Scrub the pan with hot, soapy water and a scrub brush to remove any rust or debris. Rinse thoroughly and dry completely.
- Place the pan in a preheated oven at 400°F (200°C) for one hour to ensure it is completely dry.
- Apply a thin layer of cooking oil or shortening to the entire surface of the pan, including the handle and outside.
- Use a paper towel to wipe off any excess oil – the pan should appear dry.
- Place the pan upside down in the oven, with a baking sheet or aluminum foil underneath to catch any drips.
- Bake the pan for one hour, then turn off the oven and let the pan cool completely in the oven.
Repeat this process several times to build up a robust layer of seasoning and restore the pan’s non-stick surface.
Dealing with food sticking to the pan
If you find that your food is sticking to the pan, it may be due to insufficient seasoning or inadequate heat. To prevent sticking, ensure that your pan is properly seasoned and preheated.
Allow the pan to heat up for a few minutes before adding any ingredients, and make sure to use enough oil or butter to create a barrier between the food and the pan’s surface.
If food still sticks to the pan, it may be an indication that the seasoning needs to be reinforced. Follow the seasoning process outlined earlier to build up a stronger non-stick surface.
Fixing uneven seasoning
Uneven seasoning can happen over time, especially if you wash your cast iron pan with soap or soak it in water. To fix uneven seasoning, follow these steps:
- Scrub the pan with hot, soapy water and a scrub brush to remove any food residue or excess seasoning.
- Rinse the pan thoroughly and dry it completely.
- Apply a thin layer of cooking oil or shortening to the entire surface of the pan.
- Use a paper towel to wipe off any excess oil – the pan should appear dry.
- Place the pan in a preheated oven at 350°F (175°C) for one hour.
- Let the pan cool completely in the oven before removing.
Repeat this process several times, focusing on the areas with uneven seasoning, until the surface is even and well-seasoned.

Cast Iron Product Guide
Cast iron cookware comes in a variety of sizes and types, each suited for different cooking needs. Here is a guide to help you choose the right cast iron pans for your kitchen:
Different sizes and types of Lodge cast iron pans
Lodge is a renowned brand that offers a wide range of cast iron pans. Here are some of the most popular sizes and types available:
- Skillets: Lodge skillets come in various sizes, from 6.5 inches to 13.25 inches. These versatile pans can be used for frying, sautéing, baking, and more.
- The classic skillet design features a long handle and a helper handle for easy maneuvering.
- Dutch ovens: Lodge Dutch ovens are perfect for slow cooking, roasting, and baking. They are available in different sizes, with capacities ranging from 2 quarts to 7.5 quarts. Dutch ovens feature a tight-fitting lid and are ideal for making stews, soups, and braised dishes.
- Grill pans: Lodge grill pans are designed with raised ridges, creating the signature grill marks on your food. These pans are perfect for grilling steaks, chicken, vegetables, and more. They are available in different sizes, ranging from 10.5 inches to 17 inches.
- Griddles: Lodge griddles have a large, flat surface that is perfect for cooking pancakes, eggs, sandwiches, and more. They come in various sizes, ranging from 9 inches to 20 inches, and feature a wide, flat handle for easy transport.
Choosing the right cast iron pan for your needs
When choosing a cast iron pan, consider the following factors:
- Size: Determine what size pan will best suit your cooking needs. Smaller pans are perfect for individual servings or side dishes, while larger pans are ideal for cooking for a crowd.
- Cooking style: Think about the type of dishes you frequently cook and choose a pan that suits those needs. If you enjoy searing meat, a skillet or grill pan would be a great choice. For soups and stews, a Dutch oven would be more appropriate.
- Handle design: Consider the handle design and length. Longer handles provide better leverage and control, while helper handles make it easier to lift and maneuver heavy pans.
- Versatility: Look for pans that offer versatility in terms of heat sources. Some cast iron pans are suitable for use on various stovetops, ovens, and grills.
By considering these factors, you can choose the perfect cast iron pan that meets your cooking needs and preferences.
Accessories for your cast iron pan
To enhance your cast iron cooking experience, there are several accessories that you may find useful:
- Silicone handle covers: These covers slip over the pan’s handle, providing a heat-resistant grip. They make it easier to handle hot pans and reduce the risk of burns.
- Pan scrapers: Pan scrapers are handy tools for removing food particles and stuck-on residue from your cast iron pan. They are designed to fit the contours of the pan and can be used without damaging the seasoning.
- Cast iron brush: A cast iron brush is designed specifically for cleaning cast iron pans. It has stiff bristles that can effectively remove food particles and debris.
- Lid lifter: If you frequently use Dutch ovens with heavy lids, a lid lifter can be a helpful accessory. It allows you to lift hot lids without the risk of burning your hands.
These accessories can enhance your cast iron cooking experience and make it easier to handle and maintain your cookware.
Enamel 101 – NEW!
What is enamel coating on cast iron?
Enamel coating on cast iron refers to a layer of porcelain that is applied to the surface of the pan. This coating provides several benefits and can enhance the performance and versatility of your cast iron cookware.
Benefits of enamel-coated cast iron
Enamel-coated cast iron pans offer several advantages over traditional cast iron pans. Here are some of the benefits of using enamel-coated cast iron:
- Easy cleaning: The smooth, non-porous surface of enamel-coated cast iron makes it easy to clean. Simply wash with warm, soapy water and rinse thoroughly.
- No seasoning required: Unlike traditional cast iron pans, enamel-coated pans do not require seasoning. The enamel acts as a natural non-stick surface, eliminating the need for additional oil or fat during cooking.
- Versatility: Enamel-coated cast iron pans can be used on various heat sources, including stovetops, ovens, and grills. They are compatible with both gas and electric cooktops.
- Color options: Enamel-coated cast iron pans are available in a wide range of vibrant colors, allowing you to add a pop of personality to your kitchen.
How to care for enamel-coated cast iron
Caring for enamel-coated cast iron is similar to caring for traditional cast iron, with a few minor differences. Here are some tips to help you care for your enamel-coated cookware:
- Avoid high heat: While enamel can withstand high temperatures, prolonged exposure to extremely high heat can cause the coating to crack or chip. Use medium to low heat settings when cooking with enamel-coated pans.
- Use non-abrasive utensils: To prevent scratching or damaging the enamel coating, use non-abrasive utensils, such as wooden or silicone tools.
- Avoid sudden temperature changes: Do not subject enamel-coated pans to extreme temperature changes, such as transferring a hot pan directly to cold water. This can cause thermal shock and damage the coating.
- Hand wash only: Enamel-coated cookware is not dishwasher safe. Hand wash your pans with warm, soapy water and a non-abrasive sponge. Avoid using metal scrubbers or harsh cleaning agents.
By following these care instructions, you can enjoy the benefits of enamel-coated cast iron for many years to come.

Baking 101
Using your cast iron pan for baking opens up a world of delicious possibilities. From savory bread to sweet desserts, your cast iron pan can be a versatile tool in your baking repertoire. Here are some tips for baking with cast iron:
Using your cast iron pan for baking
- Preheat the pan: Just like with stovetop cooking, it’s important to preheat your cast iron pan before baking. Place the pan in the oven as it preheats to ensure even heat distribution.
- Grease the pan: Even though cast iron has excellent non-stick properties, it’s still a good idea to grease or line the pan before baking. This will ensure easy release of the baked goods.
- Adjust baking time and temperature: Cast iron pans tend to retain heat well, which can result in faster and more even baking. Keep an eye on your baked goods and adjust the baking time and temperature as needed.
- Use hot pads or oven mitts: When handling the cast iron pan, be sure to use hot pads or oven mitts, as the pan and handle can become extremely hot in the oven.
Tips for baking in a cast iron pan
Here are some additional tips to help you achieve baking success with your cast iron pan:
- Preheat the pan with oil: Before adding the batter or dough, preheat the pan with a small amount of oil. This will help create a crispy, golden crust.
- Use parchment paper: If you’re baking something delicate or sticky, lining the pan with parchment paper can make for easier removal and cleanup.
- Avoid acidic ingredients: The acidic nature of certain ingredients, such as tomatoes or citrus fruits, can react with the cast iron and affect the flavor. Be mindful of the ingredients you use when baking in a cast iron pan.
- Experiment with recipes: Don’t be afraid to try out different recipes and get creative with your cast iron baking. From cornbread and cakes to quiches and cobblers, there are endless possibilities to explore.
Recipes for baking in cast iron pans
To get you started on your cast iron baking journey, here are two delicious recipes to try:
- Classic Cornbread: Ingredients:
- 1 cup cornmeal
- 1 cup all-purpose flour
- 1/4 cup granulated sugar
- 1 tablespoon baking powder
- 1/2 teaspoon salt
- 1 cup milk
- 1/4 cup melted butter
- 1 egg
Instructions:
- Preheat your cast iron skillet in the oven at 400°F (200°C) for 10 minutes.
- In a mixing bowl, combine the cornmeal, flour, sugar, baking powder, and salt.
- In a separate bowl, whisk together the milk, melted butter, and egg.
- Pour the wet ingredients into the dry ingredients and stir until just combined.
- Carefully remove the hot skillet from the oven and pour the batter into it.
- Bake for 20-25 minutes or until the top is golden brown and a toothpick inserted in the center comes out clean.
- Allow the cornbread to cool slightly before serving.
- Skillet Apple Crisp: Ingredients:
- 4 cups sliced apples
- 1/2 cup all-purpose flour
- 1/2 cup rolled oats
- 1/2 cup brown sugar
- 1/4 cup melted butter
- 1 teaspoon cinnamon
- 1/4 teaspoon salt
Instructions:
- Preheat your cast iron skillet in the oven at 375°F (190°C).
- In a mixing bowl, combine the flour, rolled oats, brown sugar, cinnamon, and salt.
- Pour in the melted butter and mix until the mixture resembles coarse crumbs.
- Remove the hot skillet from the oven and add the sliced apples.
- Sprinkle the crumb mixture evenly over the apples.
- Bake for 25-30 minutes or until the apples are tender and the top is golden brown.
- Serve warm with vanilla ice cream or whipped cream.
Baking in a cast iron pan adds a rustic charm and unique flavor to your favorite recipes. Explore the world of cast iron baking and discover the joy of creating delicious treats in your trusty pan.
Griddles 101
Griddles are a versatile and essential tool for any cast iron enthusiast. These flat cooking surfaces are perfect for cooking pancakes, eggs, burgers, and more. Here’s everything you need to know about griddles:
Overview of cast iron griddles
Cast iron griddles are designed with a large, flat surface that allows for even heat distribution. They typically come with a handle on one side for easy transport and maneuvering.
The flat surface of griddles creates a wide cooking area, making them ideal for cooking multiple items at once.
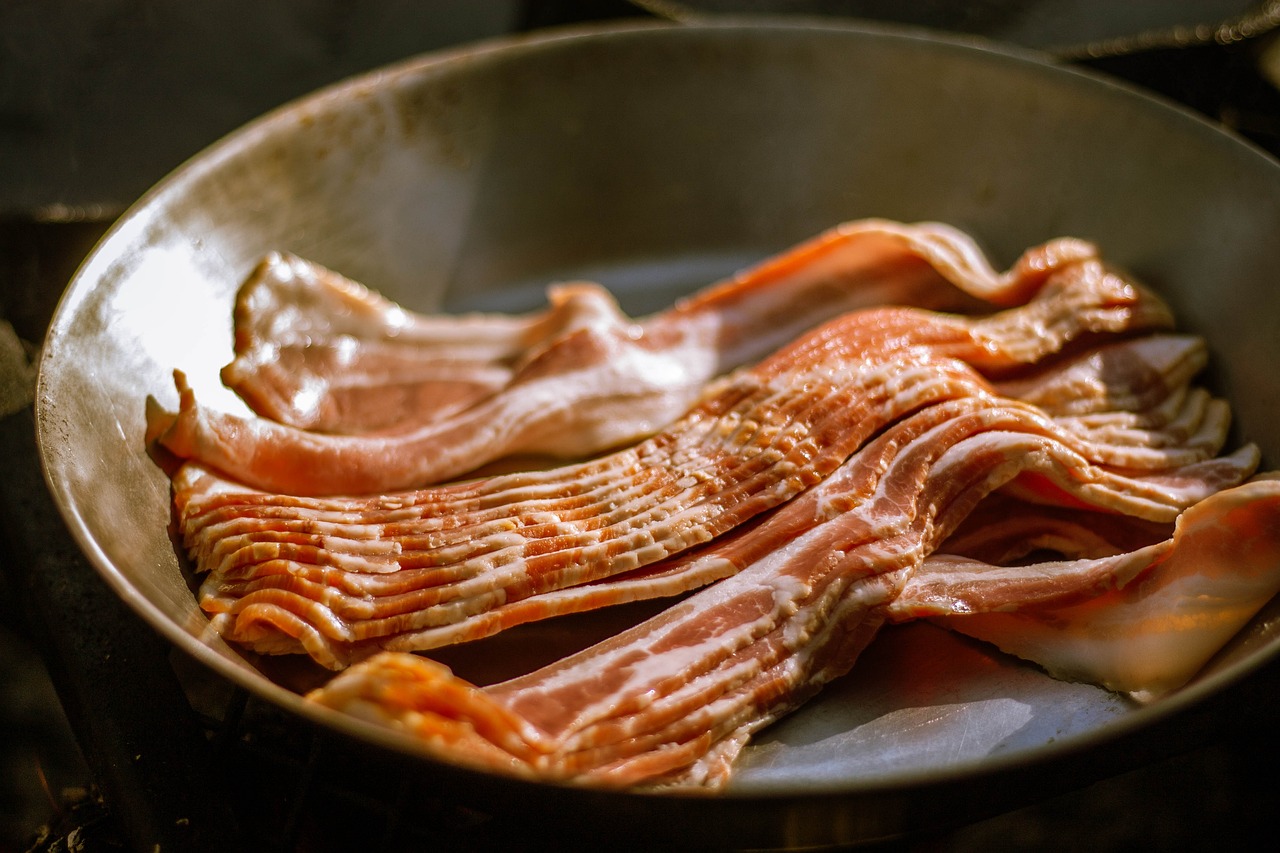
Griddles are perfect for making breakfast favorites like pancakes, eggs, and bacon. They can also be used to cook sandwiches, quesadillas, and even sear meats. With their flat surface, griddles provide excellent heat retention and are suitable for various heat sources, including stovetops and grills.
Cooking techniques with a cast iron griddle
When using a cast iron griddle, there are a few techniques you can employ to achieve the best results:
- Preheat the griddle: Just like with other cast iron pans, it’s crucial to preheat the griddle before cooking. This ensures even heat distribution and helps prevent food from sticking.
- Season the griddle: Before using a new griddle, or if you notice that food is sticking, it’s a good idea to season the surface. Follow the seasoning process mentioned earlier to create a non-stick surface.
- Use moderate heat: Cast iron griddles retain heat well, so using moderate heat is usually sufficient. Avoid using high heat, as it can cause uneven cooking and scorching.
- Cooking multiple items: With its wide surface, a cast iron griddle is perfect for cooking multiple items at once. However, be mindful of overcrowding the griddle, as this can lower the temperature and result in uneven cooking. Leave enough space between each item for optimal heat circulation.
Cleaning and maintaining a cast iron griddle
Cleaning and maintaining a cast iron griddle is similar to caring for other cast iron cookware. Here’s how to clean and maintain your griddle:
- Allow the griddle to cool slightly before cleaning. This makes it easier to remove any food residue.
- Gently scrape off any stuck-on food particles using a nylon scrub brush or scraper.
- Rinse the griddle under warm water and use a soft sponge or brush to clean the surface. Avoid using soap, as it can strip away the seasoning.
- Dry the griddle thoroughly using a kitchen towel or paper towel. If necessary, place the griddle back on the stovetop over low heat to ensure it is completely dry.
- Apply a thin layer of cooking oil or shortening to the entire surface of the griddle. Use a paper towel to wipe off any excess oil.
- Store the griddle in a cool, dry place. Avoid stacking other cookware or placing heavy objects on top of the griddle, as this can damage the surface.
With proper care and maintenance, your cast iron griddle will provide years of delicious meals and culinary adventures.
Carbon Steel 101
While cast iron is a popular choice for cookware, carbon steel pans offer a different set of advantages. Here’s everything you need to know about carbon steel cookware:
Difference between cast iron and carbon steel
While both cast iron and carbon steel pans are made from iron and have similar heat retention properties, there are a few key differences between the two:
- Weight: Carbon steel pans are generally lighter than cast iron pans. This makes them easier to handle and maneuver.
- Heat response: Carbon steel pans heat up and cool down more quickly than cast iron pans. This makes them ideal for tasks that require precise temperature control, such as sautéing or stir-frying.
- Seasoning: Like cast iron, carbon steel pans benefit from seasoning. However, carbon steel pans tend to develop a smoother, more non-stick surface with fewer layers of seasoning compared to cast iron.
- Versatility: Carbon steel pans are extremely versatile and can be used for a wide range of cooking techniques, from frying and searing to baking and braising.
Benefits of carbon steel cookware
Choosing carbon steel cookware offers several advantages in the kitchen. Here are some benefits of cooking with carbon steel pans:
- Excellent heat distribution: Carbon steel pans heat up quickly and distribute heat evenly across the cooking surface. This ensures that your food cooks evenly and eliminates hot spots.
- Lightweight: Carbon steel pans are lighter than cast iron pans, making them easier to handle and maneuver. This is especially beneficial when tossing stir-fries or flipping delicate foods.
- Natural non-stick surface: With proper seasoning, carbon steel pans develop a natural non-stick surface. This allows for easy food release and makes cleaning a breeze.
- Versatility: Carbon steel pans are suitable for a wide range of cooking techniques. Whether you’re searing a steak, stir-frying vegetables, or baking a frittata, carbon steel pans can handle it all.
Seasoning and caring for carbon steel pans
To season and care for your carbon steel pan, follow these steps:
- Wash the pan with hot, soapy water to remove any dirt or residue.
- Rinse thoroughly and dry the pan completely using a kitchen towel or paper towel.
- Apply a thin layer of cooking oil or shortening to the entire surface of the pan, including the handle.
- Use a paper towel to remove any excess oil so that the pan appears dry.
- Place the pan over medium heat and let it heat up until it begins to smoke. This helps to polymerize the oil, creating a non-stick surface.
- Remove the pan from the heat and let it cool completely. Wipe off any remaining oil with a paper towel.
- Repeat the seasoning process several times to build up a robust non-stick surface.
When caring for your carbon steel pan, avoid using soap or soaking it in water. Instead, rinse with hot water and use a soft sponge or brush to clean the surface. Dry the pan thoroughly and apply a thin layer of oil before storing.
With proper seasoning and care, your carbon steel pan will become a reliable kitchen companion for years to come.
FAQs
Can you use soap to clean cast iron?
Using soap to clean cast iron is generally not recommended, as it can strip away the seasoning. Instead, use hot water and a soft sponge or brush to clean the pan. If there are stuck-on food particles, you can create a paste using coarse salt and water to scrub them away. Rinse the pan thoroughly and dry it immediately with a kitchen towel or paper towel.
How often should I season my cast iron pan?
The frequency of seasoning your cast iron pan depends on how often you use it. As a general rule, it’s a good idea to season your pan every few months or after a deep cleaning. Frequent use and proper maintenance will help maintain the seasoning on your pan.
Can I use my cast iron pan on induction cooktops?
Cast iron pans are compatible with induction cooktops. The magnetic properties of cast iron allow it to heat up on induction stovetops. This makes cast iron a versatile option for various types of heat sources.
How do I remove rust from my cast iron pan?
To remove rust from your cast iron pan, start by scrubbing the rusted area with a scrub brush or steel wool until the rust is completely removed.
Rinse the pan under warm water and dry it thoroughly. Apply a thin layer of cooking oil or shortening to the affected area and place the pan in a preheated oven at 350°F (175°C) for one hour. Let the pan cool completely in the oven before removing. Repeat the process if necessary.
By following these frequently asked questions, you’ll have a better understanding of how to care for your cast iron cookware and address common concerns.
Cooking with cast iron is a rewarding experience that can enhance the flavor and presentation of your dishes. From the versatile cooking options to the joy of seasoning and caring for your cookware, cast iron has an enduring appeal.
Whether you’re a seasoned chef or a beginner in the kitchen, investing in cast iron cookware is a decision you won’t regret. So dust off that cast iron pan, get cooking, and savor the delicious results!
![]()
Happy Cooking!